Song Creations
As used by my guitar and music tuition school for many years with much success, I am happy to now offer these worksheets for you to download for free.

These PDF worksheets are part of an interactive book that was designed as printable lesson templates for our students. I carefully crafted each page to use as a teaching aid when tutoring students on guitar and music theory. This includes interactive worksheets for finding scales and chords on the guitar, and blank templates for rehearsing and even writing new songs.
For my music school, I wanted to make these worksheets reusable, so by laminating each page and then using a whiteboard marker whilst teaching allowed me to teach in a more visual and interactive way. Pairing this alongside the printable worksheet handouts, I found my students had picked up the lessons a lot quicker and easier. Learning this system, I am positive you will too. 🙂
If you love these worksheets, why not add them to our Student’s Companion app, a study journal app aimed at helping students study more efficiently and productively.
Free Download: Song Creations (PDF)
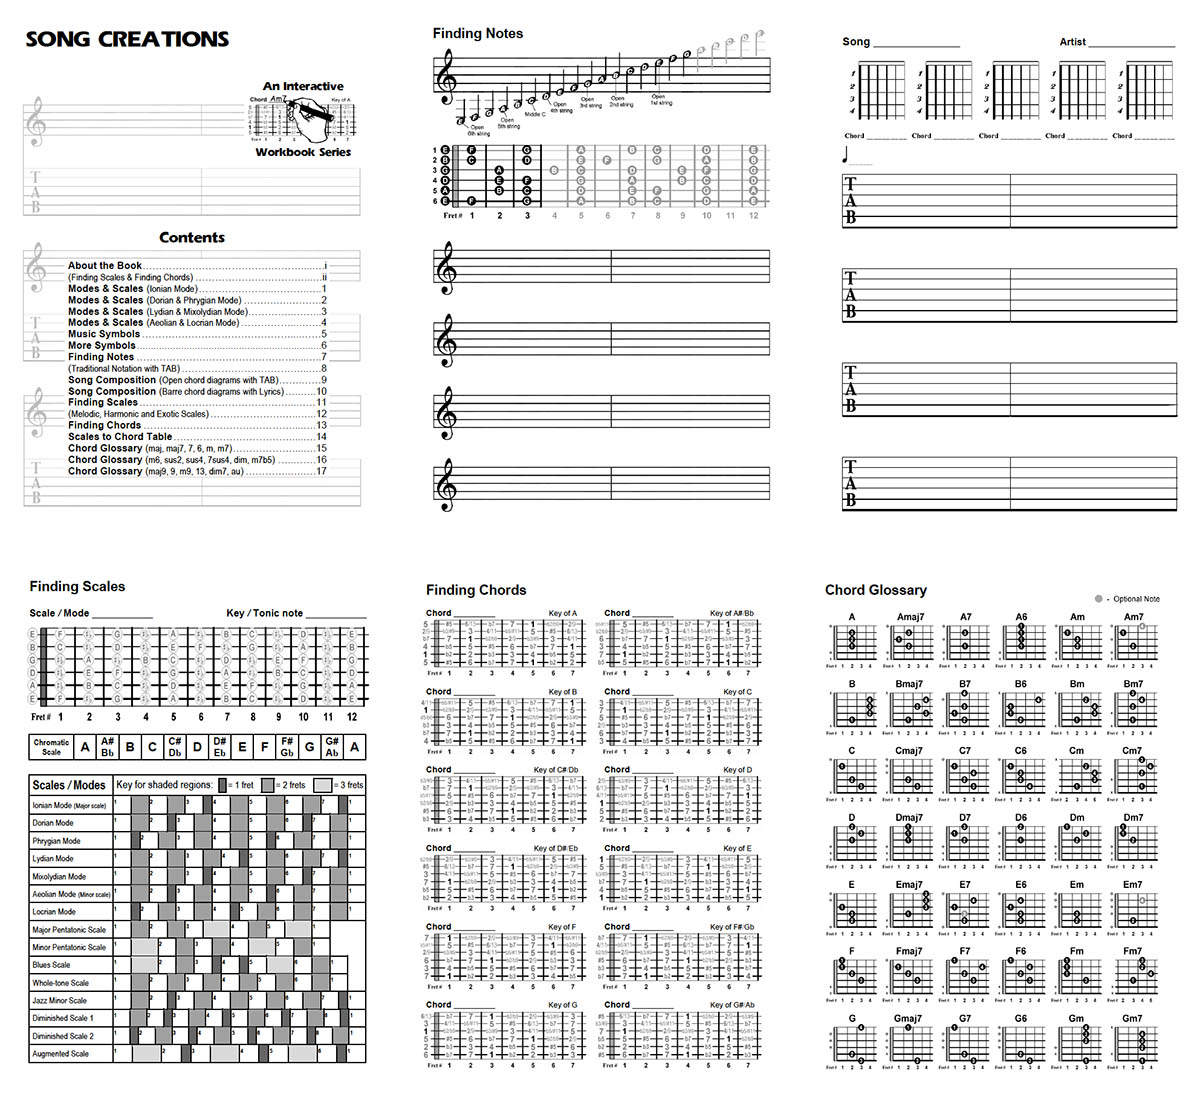
Below are some page screenshots of Song Creations

Instructions
About the Book

Song Creations is an Intermediate level workbook for guitar students, teachers and song composers. The book was designed to be versatile, portable, enjoyable and most importantly – practical. By drawing on the laminated pages with the whiteboard marker, you are able to interact with the book. These pages can also be re-used, by erasing the work with the supplied cloth or some tissues. The book begins, with theory on Modes & Scales and an insight into the traditional Music Symbols used.
Song Composition is the first of the interactive sections, which means, you can use the marker to compose your own songs. The next interactive section, called Finding Scales, gives you a vast selection of scales to learn. You can draw these scales on the guitar diagram in any key and experiment with your own shapes. Finding Chords is the last of the interactive sections where you can find and even construct your own chords, by plotting the note-numbers from the Scales to Chord Table. Whether you’re in a band, a practising guitar student or a guitar tutor, Song Creations can assist you with your guitar needs.
Modes & Scales: Page 1 – 4
The four pages in this section will give you a valuable and condensed overview of the seven modes and how they work. Modes are constructed from the major scale and it’s very important to understand, that each mode does have its own individual step-pattern. To simplify how modes work, this section is explained in the key of C major. By using this key as a starting point, you will not get tangled up with sharp notes or flat notes. This section begins, with a brief explanation of modes and their relationships with chordal harmony. Inside the mode tables, you’ll find two rows with various shaded grey boxes (or regions), made up of half steps (single frets apart) and whole-steps (2 frets apart). Shown here, is the Scale Step-pattern with an Example of a mode. In the very first example, you’ll notice that this mode is the C Ionian. As you look down the table, you’ll find a Description of the mode. It’s here, that you are given a brief description, including how the mode will differ from the major scale and some song examples where the mode can be heard in. The Quality determines the sound quality of the mode and features a very brief description of the emotions, feelings, flavours and colours the mode gives to the listener.
Again, you’ll find another brief insight into some of the most common Music Styles the mode could be found in. Tonic Chords represents the first-note or root-note chord types where the mode will work the best with. For example, if you wish to play the E Mixolydian scale, then any unaltered dominant chords in E such as: E7, E9, E11 and E13 will work perfectly. Last but not least, you are given a row named Improvising. Here you’ll find a nice sounding chord progression, so you can improvise with the mode against these chords using some of the scale diagrams below.
Music Symbols: Page 5 – 6

Both of these pages will represent the traditional symbols used in music and will give you a brief insight into some music theory. The first table in the Music Symbols page will describe the most commonly used symbols. You’ll find diagrams of the Note symbol and the Rest symbol, along with their American and English names. Each note and rest symbol will have its own Note/Rest duration. This determines how long the note or rest will play out for and can be measured in beats. The example in the brackets, such as (1 + 2 + 3 + 4 +), will show you how to count either the notes or rests as if they were repeatedly played across a bar in 4/4 time. The bold number will indicate only one of the individual note or rest symbols in the same bar. Please take into account that the Whole-note takes up the whole bar and a Half-note takes up half a bar in 4/4 time.
The table with the first column labelled Notation symbol, will give you some more extensions to the note families. Here you’ll find the note symbol, shown with either; dots, lines (i.e. lines or curves joining other note symbols) or other small symbols. These are used to change the properties of the note, such as the note’s duration (e.g. the Dotted note) or the note’s dynamics (e.g. the Accent). You’ll find the Notation name and a column labelled Equivalent value, which was especially included to help explain the symbol’s duration in another way. Last but not least, you’ll find a brief Description of the symbol.
The More Symbols page, illustrates most of the traditional symbols used in music. If you have ever bought some sheet music (e.g. of your favourite artist), you’ll find a lot of these symbols are used. In this table, you are given the Symbol, the Symbol name and a brief symbol Description.
Finding Notes: Page 7 – 8

This section was designed to help you read and compose traditional music. The first page, called Finding Notes, will show you the notes on the staff and where they exist on the guitar within the first three frets (the open position). The first note is the low E and reveals the open 6th string when the guitar is in the E tuning. The scale continues straight through to the second octave G note, which is found on the 3rd fret of the 1st string. To make things a little easier, there are no sharp or flat notes shown. The next page will show you diagrams of traditional staves and guitar tablature. You can use the whiteboard marker to draw in notes or tablature numbers on any of these diagrams. Tablature can be an excellent guide to help you learn to read traditional music.
Song Composition: Page 9 – 10
The diagrams in this section will help you compose songs with the guitar. These two pages will show: open chord diagrams with tablature and barre chord diagrams with lyrics. You have the choice of using any of these diagrams, by simply drawing in the chords, scales, lyrics or tablature with the whiteboard marker. Tablature (TAB) is a very popular medium because it’s easy to read and play. The different sized lines are a visual display of the strings on the guitar. When you enter a number on any of these tablature lines, that number represents the fret number on the guitar. Entering a number where the quarter-note symbol is, determines the tempo of your song. This is measured in beats per minute (bpm).
Finding Scales: Page 11 – 12
At the top of the Finding Scales page, you’ll see a diagram of the guitar fret-board covering all the notes up to the 12th fret. All these notes are in the popular E tuning and are lightly shown in grey for reference. If you were to play every note on one string, from the open to the 12th fret, you would have covered all the chromatic notes up to the first octave. An example of the Chromatic Scale has been included to illustrate the chromatic notes of the A string.

Using this diagram as a reference tool can help you find the notes that are needed for your scale. It’s also helpful in the long run, to memorise all the notes on the guitar fret-board.
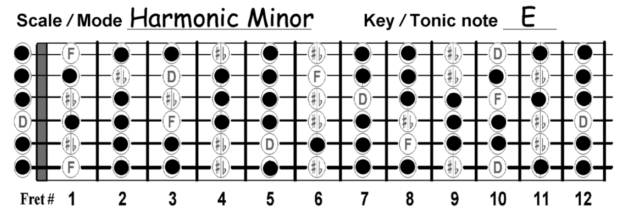
Before you draw on the guitar fret-board diagram with the whiteboard marker, you’ll need to choose a mode or scale from one of the scale tables. Once a mode or scale has been chosen, the next thing is to choose a tonic note or key-note. Let’s say you decided to find the Harmonic Minor Scale in E. You first use the marker to draw the letter E in box 1. (This box is the first and last box containing a small number 1 in the top left-hand corner). The next thing to do is to match the shaded box (grey box in-between box 1 and 2) with the Key for shaded regions. You’ll see that the next note must be two frets higher than the first. When using the Chromatic Scale diagram as a reference tool, you may soon discover that the note F# is two frets higher than E. Place the letter F# into box 2. Continue with this process until all the white boxes have note-letters in them. See the diagram below.

When you’ve found all the notes in your scale, you can now match and plot all of these notes as letters, circles or dots onto the guitar fret-board diagram. Dots are shown below.

After all the notes have been plotted, you can use this information to find things like: scales in short runs, scales from notes other than the tonic note (i.e. modes), arpeggios, chords in the open position and barre chords. The bullet points below will give you some extra tips.
- Where applicable, each white box should contain a note-letter that is different from the letter next to it. The C Locrian Mode for example, you can write: C, Db, Eb… rather than: C, C#, D#…
- Plotting the notes of the C Ionian mode will also reveal the same notes as the D Dorian mode or the E Phrygian mode, etc.
- The Ionian Mode is equivalent to the diatonic major scale.
- The Aeolian Mode is also the diatonic natural minor scale.
- The Melodic Minor Scale is an ascending scale. You should use the diatonic natural minor scale when descending.
- Diminished Scale 1 is another name I decided to use for the Whole step – Half step diminished scale.
- Diminished Scale 2 is another name I decided to use for the Half step – Whole step diminished scale.
Finding Chords: Page 13 – 14

When using the Finding Chords page in conjunction with the Scales to Chord Table, you’ll be able to find hundreds of chords with ease. You’ll also learn how the chords are formed and discover some various positions the same chord can be found in. With so many possibilities, you might even find or create some new chords yourself.
Before you draw on one of the fret-board diagrams in the Finding Chords page, it would be wise to get familiar with the Scales to Chord Table. The Chord type, which represents the first column, will give you a selection of chord types to choose from. The Notes used column will show you what notes are used from the major scale to form the particular chord. The Also written as column will show you some alternative representations of the chord. Lastly, the Scales to try column will give you a selection of scales to experiment with or improvise over the chord. On the opposite page, you’ll find twelve guitar fret-board diagrams in each of the twelve keys. These keys have been represented as note-numbers from the major scale.
Let’s run through an example so you can learn this new concept of Finding Chords. Say you decided to find a minor 7th chord in A (also known as an Am7). Using the Scales to Chord Table as a reference guide, you’ll see that a minor 7th chord uses the notes: 1, b3, 5 and b7. These are the note-numbers you’ll use to plot on one of the fretboard diagrams. In order for this concept to work, you must use the diagram that’s in the right key for your chord. In the case of your minor 7th chord in A, you’ll use the fret-board diagram that’s in the Key of A. (Notice how the tonic note A is expressed as a 1 from the major scale).
To plot your Am7 chord correctly, you should plot one note per string and make sure your chord has the exact Notes used (i.e. 1, b3, 5 and b7). If you were to plot a few notes per string, you may unintentionally turn your Am7 into an A minor by plotting the higher octave 1 in front of the b7. A good idea is to draw circles so you can clearly see what lies underneath. This way you can determine the note-letters you may have missed. See if you can find another Am7 chord. (Hint: 1 is on the 5th fret, 6th string).

- A pure 3rd note (3) or Major 3rd is present in major chords.
- A flat 3rd note (b3) or Minor 3rd is present in minor chords.
- A flat 5th note (b5) is often known as a Diminished 5th. – A sharp 5th note (#5) is often known as an Augmented 5th.
- A flat 7th note (b7) is present in Dominant 7th chords (eg E7).
- Once a scale continues past the octave note (i.e. from 1 to high 1) the 2nd will now become a 9th (2/9), the 4th will be an 11th (4/11), and the 6th will become a 13th (6/13). The flat 3rd will now be represented as a sharp 9th (b3/#9) and so on.
- Some note-numbers shown in the Notes Used column are not displayed in the bold type. You can experiment with your chord by leaving out that note-number. An example of leaving out the 5 can be evident in some Major 9th chords.
Chord Glossary: Page 15 – 17

We have created a 3-page chord glossary containing many of the well known chords for each key.
- Page 15: maj, maj7, 7, 6, m, m7
- Page 16: m6, sus2, sus4, 7sus4, dim, m7b5
- Page 17: maj9, 9, m9, 13, dim7, aug

